Since I have the same students for two years, I had to do something different for this school year. I had been wanting to try my hand at tie-dying, so each child got to tie-dye a shirt for their end of the year gift. It was definitely more intense than I thought it would be, but it was well worth it. They loved their shirts and enjoyed getting to wear them to our end of the year party.
Background
Wednesday, June 25, 2014
Until we meet again...
It is hard to believe that there are still some schools in session! We got out about a week earlier this year, so I am on week number 5 of summer vacation. Of course, I have already been thinking about and working on my classroom for next year, but I wanted to share some end of the year ideas before I moved on too much. Two years ago, I gave each of my students a sand bucket with their name on it. I got the sand buckets from Michael's for less than a $1 each. Michael's ends up being a better deal than the Dollar Store because I can use my teacher discount. In each bucket, I included an end of the year letter, their report card, a summer reading list, some sumer activities, a dvd of our class photos from the year and a compliment book. The compliment book is my favorite thing we do at the end of the year. I got the idea from TPT: http://www.teacherspayteachers.com/Product/End-of-the-Year-Class-Compliments-FREE-704033 The kids love reading all the nice things their classmates say about them, and it makes for a positive way to end the school year. I also did the candy bar awards, so their candy was in their bucket as well.
Saturday, June 21, 2014
Everything is Awesome!!!
With the Lego Movie coming out this week (and yes, it is awesome), I thought a Lego post would be most appropriate. My husband, who sometimes reminds of President Business with his love and need to preserve toys, loves to incorporate Legos into his art classes. Those lessons tend to be his most popular with boys and girls alike. I know our house is busting at the seams with Legos and everything is awesome until you step on one. For our children, Lego creations are works of art that need to be on display, but they are also hard to store. Check out a couple of the solutions we came up with.
My mom had some old Pepsi crates, so we decided to use one to store some Lego figures. I hot glued one or two yellow blocks into each compartment. Some of the slots were broken, so I had to improvise. Then, Quintin got to pick the figures he wanted to put on display. For our many Lego pieces and instruction guides, we also found this cool storage at my mom's house. She had it in her carport, so it was in pretty bad shape. Let's just say lots of spiders and rust were involved. However, it looked brand new after a good cleaning, sanding, and an awesome Lego yellow paint job!
Friday, June 20, 2014
Pinwheel Spinning Around
With some inspiration from Pinterest, I created some pinwheel centerpieces this school year. Our school colors are blue and gray, so that determined my color scheme. I was able to find the perfect scrapbook paper patterns at Hobby Lobby. Then, I used the tutorial I found here: http://www.littleloveliesbyallison.com/2011/06/wall-art-light-airy-part-1.html My pinwheels did not need to spin, so I stapled the center and hot glued a button over the staple. After my pinwheels were done, I hot glued each pinwheel to a wooden dowel. I had my husband use his saw to cut off some of the dowels, so the pinwheels would not all be the same hight. I then used plain mason jars to hold the pinwheels. A beautiful wedding I was lucky to be a part of used white beans in their centerpieces, so I borrowed their great idea. I also wrapped the mason jars with some twine using hot glue. For a finishing touch, I placed each centerpiece on a woodgrain piece of scrapbook paper to keep the rustic look going. I also made a thank you banner using a pre-made burlap banner I purchased from Hobby Lobby for around $5. I then took some letters I already had in my classroom and added them to the banner. First, I laminated each letter and then hot glued them to the banner. I really liked the way it turned out! Check out the pics below.
Wednesday, June 18, 2014
For the love of trees...
We love trees in the Miller house, but apparently we love making art more. Finding a nice balance is hard when our oldest son can go through an entire ream of paper in 1 week. Nothing makes him happier than when I bring him home a fresh pack. However, figuring out how to store all these masterpieces has been a challenge. He is his biggest critic, so he has no trouble figuring out which pieces to keep. The picture below shows about an hours worth of work. In order to save on space, the majority of his artwork I store online using ARTKIVE, http://www.artkiveapp.com. I downloaded the app for free, and all I have to do is take pictures of his work. You can also make books of their work, but they are pricey.
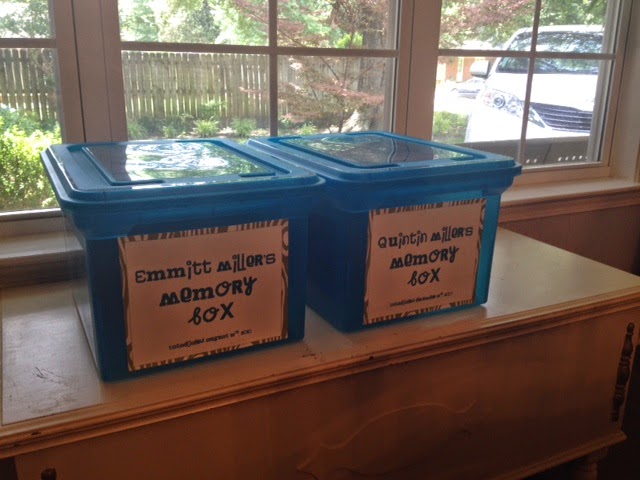
Finding a solution for his artwork was only half our battle. We all know how much paperwork comes home from school as well. You feel guilty when you throw any of their cute work away, but I try to only save the best of the best or work that shows a major milestone in his development. Of course, you want to keep any awards or special recognitions. At first, I tried using a binder, but that got a little tedious and not everything I wanted to save would fit. Then, I decided to use the same technique I use for my students' work in my classroom. I purchased a hanging file folder box for each of my boys. I then labeled the files for each grade. So far, it works great. I just open the box and drop in anything we want to keep. I store the boxes in their closet, so they are out of the way. I made a cover for each of their boxes using a laminated sheet of card stock. The font I used is elise from Kevin and Amanda. If you have not stopped by and downloaded their free fonts, you need to now: http://www.kevinandamanda.com/fonts/freescrapbookfonts/ Check out the pics below to see how they turned out. I would love your feedback, so leave me a comment:)
| Cover |
| Labeled files starting with preschool |
| Work samples |
Monday, June 16, 2014
Finding Sunshine
This year I created a box of sunshine for an end of the year teacher gift. I got the idea and free printable off of Pinterest from this website: http://happymoneysaver.com/send-a-box-of-sunshine-to-brighten-someones-day/ The basic idea is you fill the box with yellow items. I was able to find most of my items at Michael's, Target and The Dollar Store. I did venture to Bath and Body Works for their Kitchen Lemon hand soap. For the box, I used a cake box from Michael's. Check out the pics below to see how it turned out.
Saturday, June 14, 2014
Making room for a party of 5...
Baby boy number 3 will be here in a little over a month. Unfortunately, our house we bought almost 9 years ago has not grown like our family has. So my response to, "Do you have his nursery ready?" is "Yes, his corner is all done!" We co-slept with our other 2 boys when they were little, so that part will not be that different. The part that is becoming a challenge is figuring out where to store all of his stuff. Even though Quintin and Emmitt slept with us, they still had their own room. Our master bedroom is 12 by 12, so space has always been an issue. With a little help from Pinterest, I think we came up with some creative solutions. Check out the pics below. Here's to making the most out of small spaces!
| For his wall, we included a picture of his big brothers and his namesake's Navy retirement plaque. |
| For clothing storage, we found some drawers on a Facebook resale page. The drawers fit nicely under our bed. We are hoping to add some sort of wheels to the bottom of the drawers. |
| We used the top of our dresser as a changing table. |
| I was able to move my out of season clothes to our hall closet to make some room for hanging storage. Our closet is already pretty small. |
| I added some baskets to our console table in the living room for some toy and book storage. |
Saturday, December 8, 2012
No place like home for the holidays!
Since we completed the renovation of our kitchen and dinning room, we began working on our living room. The living room is the reason we bought our house. It came with beautiful hardwood floors and plantation shutters, but the L shape made it hard to maximize space. After 7 years, I think we finally got it right. I still want to add some to the office area, but I will figure that out later. It is time to enjoy the holidays and stop working on our house!!!
![]() |
| Yes, Thomas is a regular show on our tv! We found our amazing entertainment stand at a garage sale for only $50. |
![]() |
| I found our curtains at Target. We put some sheer white ones in the middle to breakup the pattern. Of course, I got the idea on Pinterest. I really like the way it turned out! |
![]() |
| We found four of our frames at Hobby Lobby and painted a couple of our old ones. |
![]() |
| The table and chairs are from Target. |
![]() |
| We found this console table at an estate sale and painted it. I wanted to use chalk paint, but it is so expensive. I did a search on the computer and stumbled across an amazing blog, I heart Nap Time. I used her chalk paint recipe, and it turned out great. Here is a link to the recipe http://www.iheartnaptime.net/chalk-paint/. I just bought cheap paint from Wal-Mart. My husband added the chevron stripes to our cork board. It is a great Christmas card holder and display for children's work. |
Subscribe to:
Posts (Atom)